Scott’s Slow Oven-Roasted Tri-Tip

The most popular recipe on ScottsKitchen.com has been my 2005 recipe for oven roasted tri-tip roast. I’ve made tri-tips with that recipe dozens of times (or so it seems!).

More recently, I’ve re-discovered the tenderness benefits of slow roasting beef. There’s another recipe here (2009 Recession-Era Slow-Roasted Roast Beef) that demonstrates that technique. Turns out that technique is used by deli’s to make their roast beef for slicing and sandwiches. It both minimizes the weight loss from cooking the beef plus it allowed cheaper cuts of beef to be used as well.

Turns out that slow roasting can be useful with tri-tip roasts as well. My version using this process follows below. Give it a try and let me know how it works for you!

Ingredients

  • 2.5 to 3 lb tri-tip roast
  • 2 Tbs olive oil or other cooking oil
  • Plenty of salt and fresh ground pepper

Directions

  1. About 30 minutes ahead of time, bring the tri-tip out of the refrigerator to allow it to begin warming.
  2. About 15 minutes ahead of time, pre-heat the oven to 350 degrees.
  3. Add 2 tablespoons of olive oil or other cooking oil to a large, heavy ovenproof pan. Heat pan on high.
  4. When the pan is very hot, add the tri-tip, fat side down. Turn heat to medium-high and sear roast for about 4 minutes. Turn the roast and put the pan with the tri-tip into the oven.
  5. Immediately turn the oven down to 225 degrees. Cook roast for about 15 minutes a pound, checking with an instant-read thermometer after 30 minutes. When it reaches 130 degrees it’s medium-rare and time to take the pan out of the oven.
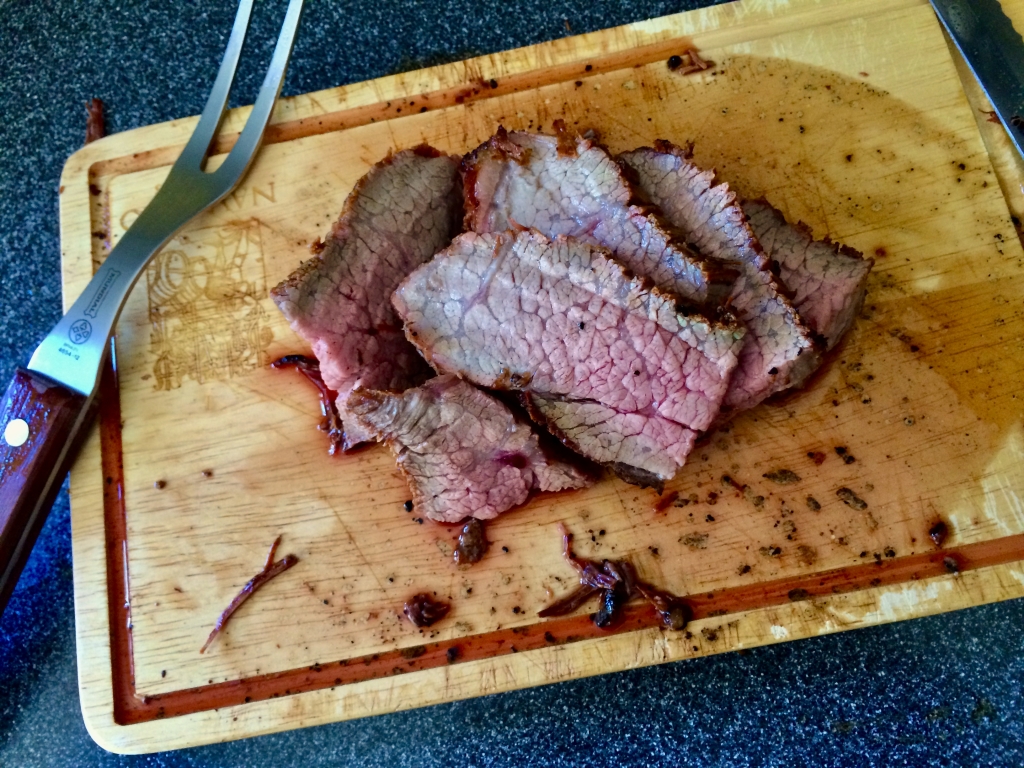
  6. Remove tri-tip to cutting board. Wrap tri-tip in aluminum foil and leave for 10-15 minutes to allow the juices to settle.
  7. Remove tri-tip from the foil and thinly slice it against the grain (in other words, across the grain). Serve on a platter – BBQ sauce or steak sauce totally optional.

(Added: December 17, 2019; Updated: December 24, 2020)

Tri-tip ready for the oven

In the oven-proof skillet about to go into the oven at 350 degrees – and immediately turned down to 225 degrees.

Sliced slow-roasted tri-tip ready to eat – delicious!

Note the beautiful color that this slow roasting technique produces!

Scott’s 2018 Short Ribs

This is a perfect recipe for a lazy Sunday afternoon – serving two or with guests serving four! The short ribs need about 3 hours to cook – so start around 2 PM and you’ll be ready for a great dinner about 5:30 or 6 PM.

The inspiration for this recipe came from chef Marcus Samuelsson’s Obama’s Short Ribs recipe as described in the New York Times – and it’s also in the chef’s Red Rooster Cookbook – The Story of Food and Hustle in Harlem.

I’ve made several modifications – basically to make it simpler and easier. I usually try to rework recipes that use amounts of ingredients that result in wasting portions that you might buy in standard size packages. So, I adjusted – and simplified – and the result was great!

Ingredients

  • 4 to 6 (6-ounce) bone-in short ribs (about 2.5 to 3.5 lbs)
  • Salt and freshly ground black pepper
  • 2 tablespoons vegetable oil
  • 14.5 oz package of Mirepoix (Trader Joes or Whole Foods) – containing 1 onion (chopped), 1 carrot (trimmed and chopped), 2 celery ribs, (trimmed and chopped)
  • 1 lemongrass stalk, trimmed, smashed and minced
  • 3 garlic cloves, chopped – or about 1-1/2 tbs of already minced garlic
  • 1 Optional (1-inch) piece ginger, peeled and minced
  • ½ cup red wine (Cabernet Sauvignon or Zinfandel)
  • 3 cups beef broth (2 cups if only 4 ribs)
  • ½ cup plum sauce (¼ cup if only 4 ribs)
  • ½ cup soy sauce (¼ cup if only 4 ribs)
  • 2 sprigs thyme
  • 2 sprigs flat-leaf parsley
  • 2 bay leaves

Directions

  1. Heat oven to 325 degrees. Pat meat dry with paper towels. Season ribs all over with salt and pepper.
  2. Heat vegetable oil in a large Dutch oven over medium-high heat. When oil shimmers, add short ribs and brown on all four sides, about 2 minutes per side; transfer to a plate.
  3. Add mirepoix (onion, carrot, celery), lemongrass, garlic and ginger to the pot. Season with salt and cook, stirring often, until onion softens, about 5 minutes.
  4. Add in wine, beef broth, plum sauce, soy sauce, thyme, parsley and bay leaves and bring to a simmer.
  5. Return short ribs to pot, along with any juices, cover and slide pot into oven. Braise until meat is fork-tender, about 3 hours.
  6. Transfer meat to a plate. Use a ladle to skim the fat off the top of the braising liquid. Discard bay leaves and thyme stems. Season to taste with salt and pepper.
  7. Add short ribs and turn to coat in the sauce; set aside until you’re ready to serve.
  8. Serve short ribs in shallow bowls and top with a spoonful of sauce. Put remaining sauce in a bowl for the table. Enjoy!
  9. Serve with the rest of the red wine – and, likely, a second bottle! If there are leftovers, congratulations – as the ribs are even better warmed up tomorrow!

[First posted: February 26, 2018]

Scott’s Wintertime Beef, Mushroom and Barley Soup

A favorite of mine this time of year is a hearty beef, mushroom and barley soup.

Some might call it a “beef stew” – and they’d be right. But it’s got a lot of liquid – assuming you use all of the liquids called for – yet has the great flavor of a beef stew. We made this for a second time today – using an amalgamation of one of Mark Bittman’s recipes along with a slow cooker recipe from Cooks Illustrated.

Ingredients

  • 1 oz dried Porcini mushrooms
  • 1.5 – 2 lbs beef chuck roast – cut into 1 inch cubes
  • 8 oz fresh Cremini mushrooms
  • 28 oz canned diced tomatoes
  • 8 oz mini carrots
  • 3 yellow onions – chopped
  • 4 oz tomato paste
  • 8 oz mini carrots
  • 2 oz Penzey’s shallots
  • 2 oz Penzey’s garlic
  • 1/2 cup red wine
  • 1/4 cup tomato paste
  • 28 oz can of diced tomatoes
  • 2 cups beef broth
  • 2 cups chicken broth

Directions

  • Soak the dried Porcini mushrooms in a cup of hot water.
  • In a Dutch oven, heat the olive oil and add the beef – brown for 10-15 minutes. Remove using a slotted spoon. Discard most of the fat remaining.
  • In a separate pan, brown the mushrooms – first dry and later adding a bit of olive oil.
  • In the Dutch oven, add the onions, salt and pepper. Add in the tomato paste, carrots, shallots, and garlic. Add in the mushrooms. Add in the porcini mushrooms – and the liquid while being careful to avoid any grit. Saute for 10 mins. Add the red wine. After 10 mins, add the tomatoes, beef broth and chicken broth.
  • Bring mixture to a boil.
  • Reduce heat to low – cover the Dutch oven and continue cooking for 1.5-2 hours. Taste the beef for tenderness to determine when ready to serve.Serve in large soup bowls – perhaps with crusty bread! Enjoy!

Easy Oven Roasted Tri-Tips for Super Bowl Sunday

Scott’s Lazy-S Oven Roasted Tri-Tip

Looking for a super easy but delicious treat for your Super Bowl Sunday get together? One of my all-time favorites is my ‘Lazy-S’ Easy Oven-Roasted Tri-Tips recipe first posted here back in 2005.

Whenever we’re having a group get together, this is one of my favorite meats to serve. It’s easy to prepare and cook – less than an hour – and tastes great warm and cool. It’s perfect to put out on a buffet table where guests can come back for me – and they will!

The recipe includes a seasoning step the day before – but that’s optional. If you don’t have that much advance time, just season the tri-tip when you bring it home from the store on Super Bowl Sunday and you’ll be good to go.

Enjoy your Super Bowl – and I hope you share a great tri-tip this year to go along with it!

What’s for Dinner Tonight? – Sunday, November 13, 2011

Earlier this week, I stumbled across this recipe for Slow Roasted Beef in Tomato Sauce by Joanne Wilson which I promptly bookmarked as something we might want to make as we move into fall, etc.

Yesterday, I was out shopping and ended up buying a 2 lb boneless chuck roast – knowing that I had this recipe in my head. This afternoon we cooked it – and it was just great.

This is one of those lazy Sunday afternoon recipes. There’s a flurry of activity around 1:30 PM as you sear the beef, sauté the veggies, open the wine, prepare the beef stock, etc. Perhaps 20 minutes of serious cooking and preparation – and then you’re in monitoring mode for the rest of the afternoon.

Our approach was a bit different from Joanne’s. Specifically, we had a two pound boneless chuck roast from our local Safeway. After browning it in a bit of olive oil, we sautéed a container of Mirepoix from our local Trader Joe’s before tossing the chuck back on top and then adding the red wine, beef stock, and seasonings. We brought the mixture up to a boil and then backed it back down to the lowest setting on our stove – and just let it simmer for a bit over 3 hours. Along the way, we poked at it every hour or so – getting more aggressive in the last hour.

The result was just perfect. Falling apart tender, superb flavor from the tomatoes, thyme, bay leaves, etc.. We served it simply – with sautéed haricot vert and garlic mashed potatoes. Wonderful.

It’s Time for Minimalist Roast Chicken

Roast chicken

It’s starting to feel a bit like fall here in Menlo Park – which always brings to mind cooking roast chicken in the oven. We’re mostly wintertime roast chicken people – not wanting to bother with it during the summer. But as we get into the fall season, and the days cool off, roast chicken comes to mind as one of our weekend dinners.

I recently came across this simple roast chicken recipe from Mark Bittman. Click through for the recipe and also a link to one of his Minimalist videos where he shows the technique.

It’s a really simple recipe. His key breakthrough was discovering that the use of a cast iron skillet for roasting the chicken helped balance having the white/dark meat cooking appropriately. He recommends putting the skillet into the oven when you first turn it on – and use a high heat (he suggests 500 degrees which our oven won’t quite reach!). As the oven warms, the skillet warms up with it – so that when the chicken is put into the skillet to cook, the warm skillet will help the thighs and dark meat cook a bit faster while letting the breast meat cook normally. It’s this orchestrated imbalance that provides the magic to his recipe.

Give it a try for one of your weekend dinners!

Photo by Rosie 55.

Scott’s Easy Skillet Pork Chop Dinner with Lemon-Mustard Sauce

Yesterday, I picked up some boneless pork chops from Trader Joe’s – each about 3/4 of an inch thick. These chops are perfect for a quick (25 minutes or so) meals when cooked in a skilled on the stove. They’re also low fat!

This technique involves first searing the pork chops on high heat for 2 minutes/side to get a nice flavor on the outside – and then slowing down the cooking with some liquid that helps keep them moist and flavorful on the inside. The mustard and lemon juice used for the finishing sauce adds a very nice sweet/sour taste to the chops – they’re delicious.

Here’s my recipe – modified from Mark Bittman’s recipe.

  • An hour or two before I cook the the chops – or at the last minute if I forgot (!), I first coat them liberally on both sides with my favorite pork seasoning rub – Penzey’s Galena Street. This rub is an absolute must have for grilling thick pork chops on the Weber BBQ – and its equally good for these pan-fried chops. Trust me, Penzey’s Galena Street Rub is just the best for pork chops!
  • Heat 2 Tbsp of olive oil on medium-high heat in the skillet until it’s shimmering. Add the chops to the skillet and turn the heat up to high. Cook on high for 2 minutes per side.
  • Add 1/2 cup white wine, 1 Tbsp minced garlic and 1 Tbsp minced shallots (we love both of these from Penzey’s – we’re fortunate to have a local Penzey’s outlet here in Menlo Park!). Turn the heat down to low and cover the pan. Set a timer for 10 minutes. While you’re waiting, you can toss a quick salad or sauté some fresh veggies to accompany the chops.
  • When the timer is up, check the chops for doneness – firm to the touch – and, if done, remove them to a platter. You should still have some liquid left in the pan – if not add a touch of water. Then add 1 Tbsp lemon juice plus 2 Tbsp coarse mustard. Reduce this a bit over medium-high heat and then pour a bit over the chops. Put the rest into a small bowl or pitcher to accompany the chops to the dinner table. You’ll want to add more of the sauce to the chops – and maybe the veggies – during the meal!

That’s it – about 25 minutes start to finish – not counting the 5 minutes it takes to rub the chops in advance. Hope you enjoy!

A Whole New Approach to Tri-Tip!

A few weeks ago, I noted Mark Bittman’s alternative approach to cooking a great tri-tip steak. Tonight, we made Mark’s recipe – with (naturally) our own tweaks. The result – steak and a modified Remesco sauce – was outstanding!

I followed Mark’s recipe with respect to the tri-tip itself – cooking it 5 minutes over very high heat in a cast iron skillet – followed by putting the cast iron skillet into a very hot (450+ degrees) oven for (in our case) about 15 minutes (our oven peaks at 450 – not 500 degrees). The key is watching the tri-tip to reach 125 degrees internal temperature.

While grilling the tri-tip in the skillet, I also cooked the small plum tomatoes in the other half of the skillet. The tomatoes got nicely soft and a bit roasted. I took the tomatoes out of the skillet just before flipping the tri-tip as I was putting the tri-tip in the skillet into the high-heat oven.

The tomatoes went into another pan – along with some slivered almonds, some minced garlic, a healthy amount of olive oil and – a few minutes later – a few tablespoons of sherry wine vinegar. While the tri-tip finished cooking and resting for 5 minutes, the sauce simmered – developing an amazing flavor.

As usual, I sliced the tri-tip against the grain and smothered the slices on the serving plates with the sauce. Wow – what a great combination of flavors! With this technique, I avoided using a food processor and was able to use simpler ingredients (sliced almonds, minced garlic) to produce an amazing result! Thanks to Mark Bittman and his recipe for his suggestions on this Romesco sauce – the flavors are superb – and a great accompaniment to tri-tip!

New Year’s Eve Pasta – 2009 Edition

My wife made a wonderful pasta dish for tonight’s New Year’s Eve supper. She made it up as she went along – something she likes to do and is very good at! I tried to capture the process in real-time!

Here’s the gist:

  • Bring 6 qts water to a boil over high heat, add 2 Tbsp salt, add 1 lb fettucine. Cook al dente and drain pasta.
  • While waiting for the pasta water to boil, heat 3 Tbsp olive oil in a large saute pan over medium heat.
  • Add 3 diced shallots and 1/4 tsp red pepper flakes and saute quickly.
  • Add 8-10 oz sliced cremini mushrooms, season with salt and pepper. Saute the mushrooms until softened, about 5 min.
  • Add 1/2 cup low-sodium chicken broth, 5 cut-up pieces of cooked bacon, 1/2 lb thin, sliced asparagus and 6 Roma sliced tomatoes (peeled or peel after cooking a bit).
  • Cook stirring gently for 2 minutes. Stir in 3/4 cup heavy cream (or 1/2 cup cream and 1/4 cup red wine). Immediately reduce heat and cook until thickened.

That’s it – a very tasty pasta dish for New Year’s Eve. Serve with a special red wine (we served ours with a wonderful Copain Anderson Valley Pinot Noir that was a Christmas gift from good friends)

Happy New Year! Best wishes for a wonderful 2010!

Christmas Dinner: A Dry-Brined and High-Heat Upside Down Turkey

Merry Christmas!

Today, for our Christmas dinner 2009, we’ll be cooking a 14-lb Diestel turkey that we’ve dry-brined this week using this recipe from an article in the Los Angeles Times. Dry brining requires thinking ahead – like three days ahead when the turkey needs to be salted and tucked away in the back of the refrigerator.

We’ll be cooking the bird today using our high-heat upside down roast turkey recipe, a family favorite that produces wonderful results.

Friends are bringing a couple of side dishes to have along with the stuffing we’ll be making. Yum! – getting hungry already!

Update: Just a quick note to report that the Christmas turkey turned out to be excellent – moist white meat, great flavor! Our little experiment in dry-brining the holiday bird was a big success! Thanks to Russ Parsons for his article and recipe!